Author Topic: 1988 Turbo 'Vert Project  (Read 37078 times)

0 Members and 1 Guest are viewing this topic.

Offline toplessFC3Sman

  • Sr. Member
  • ****
  • Posts: 405
  • Karma: 8
Re: 1988 Turbo 'Vert Project
« Reply #30 on: May 03, 2012, 09:30:23 PM »
What other methods of adjusting rear camber are there? I've only seen the drop-link and the individual links on the trailing arms, and the individual links seem like they have a much greater tendency to break.  A camber plate on the back, like for McPherson struts wouldn't work.  Last option would be coming up with something to shim under the springs to raise the rear ride height, which I'm not against.  I'd like to get a set of the ground control seats & springs, and the front camber plates to raise the car closer to stock ride height, but that'll happen when I get the spare money to do it.

Offline fidelity101

  • Sr. Member
  • ****
  • Posts: 462
  • Karma: 4
Re: 1988 Turbo 'Vert Project
« Reply #31 on: May 04, 2012, 09:18:33 AM »
Well if you go solid subframe mounts the you need to use a different method other than the lateral link.

Offline ITSWILL

  • Rotary God!!
  • ******
  • Posts: I am a geek!!
  • Karma: 9
  • Gender: Male
Re: 1988 Turbo 'Vert Project
« Reply #32 on: May 05, 2012, 05:53:19 AM »
I was thinking about the individual adjusters. 
86 Base LS1 w/100 shot
88 TII 20B T70 turbo

Offline toplessFC3Sman

  • Sr. Member
  • ****
  • Posts: 405
  • Karma: 8
Re: 1988 Turbo 'Vert Project
« Reply #33 on: May 07, 2012, 07:17:57 PM »
You are not allowed to view links. Register or Login
Well if you go solid subframe mounts the you need to use a different method other than the lateral link.

I'm keeping some compliance in most of the mounts, its still a 'vert so it's never going to be the lightest, stiffest thing out there, so I may as well make it reasonable for cruising too.

Im really leaning towards ground control coil-overs, and spec'ing my own springs to raise the ride height a little (to prob about 1/2" - 3/4" lower than stock, I'm at maybe 1 1/2" lower right now) since i've definitely noticed some geometry issues with the steering, and to take out the excessive negative camber at the back, and balance it with a camber plate at the front.

Offline fidelity101

  • Sr. Member
  • ****
  • Posts: 462
  • Karma: 4
Re: 1988 Turbo 'Vert Project
« Reply #34 on: May 08, 2012, 05:18:41 AM »
You remind me. I need an alignment in the rx7, the toe is all outa wack on it just a tad.

Offline toplessFC3Sman

  • Sr. Member
  • ****
  • Posts: 405
  • Karma: 8
Re: 1988 Turbo 'Vert Project
« Reply #35 on: June 18, 2012, 10:38:52 AM »
Re-packed the front bearings on saturday, since they were both a little loose and making some noise when heavily loaded at the AROC auto-x the weekend before.  The drivers side went nice & smoothly, but unfortunately I spent a good 4 hours trying to get the brake disk off of the passenger side hub.  After lots of penetrating oil and propane spent, and tons of hammer & pry-bar action, I eventually gave up and just re-packed & torqued them with the disk still on the hub.  I'll need to get it off eventually, but may need a press for that to happen.

Then there was the CCM auto-x on sunday, and the front end (and entire car for that matter) felt very good.  A bit loose, but the sealed asphalt in that lot tends to do that.  My last (and fastest) run, I unintentionally crossed the line backwards, stopped, and reversed out of the exit lane - no cones!

Offline toplessFC3Sman

  • Sr. Member
  • ****
  • Posts: 405
  • Karma: 8
Re: 1988 Turbo 'Vert Project
« Reply #36 on: August 10, 2012, 07:24:25 PM »
Finally got all the wiring back together and the interior re-assembled.  I've had an aftermarket alarm system for close to 2 years, sitting in a box waiting to be installed, and finally got around to it this past month.  Unfortunately, one of the output channels, which I was planning on using to close the windows from the remote, was burnt out, but the alarm, automatic door locks, and windows down work well.  Plus, I re-glued and painted a lot of the interior plastics that had cracked and were looking pretty shitty.  They're looking a lot better now, coated with some bed-liner... not perfect, but passable.

Anyhow, good to be driving her again

Offline ~Groll69~

  • Administrator
  • Rotary God!!
  • *****
  • Posts: 1235
  • Karma: 1
  • Gender: Male
    • Elegant Lady Bridal and Tuxedo
Re: 1988 Turbo 'Vert Project
« Reply #37 on: August 11, 2012, 07:56:02 AM »
That is great.   Cant wait to see your car in person again.
"Long Live Rotary"

An RX-7 is like having a slut as a gf! She will love you, but she will also screw around with the guy at the parts store, most of the local cops, your insurance agent, your apex seals, your bank account and your credit card!!!

Offline toplessFC3Sman

  • Sr. Member
  • ****
  • Posts: 405
  • Karma: 8
Re: 1988 Turbo 'Vert Project
« Reply #38 on: August 12, 2012, 04:27:06 PM »
I realized after putting it all back together that I forgot to re-paint the ash tray cover... oops.  It's working well though, just trying to figure out some niggling problems with the alarm, and my prosport boost gauge crapped out on me about a month and a half ago, right on the 2-year schedule (the previous ones did the same - we'll see how they respond)

Is anything happening for woodward?  I'm planning on being out & cruising anyway, I just don't get on the boards too much anymore.

Offline ITSWILL

  • Rotary God!!
  • ******
  • Posts: I am a geek!!
  • Karma: 9
  • Gender: Male
Re: 1988 Turbo 'Vert Project
« Reply #39 on: August 12, 2012, 08:43:49 PM »
Were going to be in the spot in Pontiac.  We cleaned up and fenced off the lot today.  Come help me tune the car!
86 Base LS1 w/100 shot
88 TII 20B T70 turbo

Offline toplessFC3Sman

  • Sr. Member
  • ****
  • Posts: 405
  • Karma: 8
Re: 1988 Turbo 'Vert Project
« Reply #40 on: May 20, 2013, 08:24:27 AM »
Finally had a chance to make some progress on the RX-7 this past weekend; not much but its a start!  Savannah has moved from the parking lot outside my apt to my fiance's parents garage, and is up on jack stands awaiting a new water pump, replacement of some of the studs holding the oil pan & brace on, new brake rotors, new LIM to block gasket, turbo blanket & downpipe wrap, and some welding on the exhaust (plus I'm sure I'm forgetting a couple things on the list).

Anyway, dove in to drain all the fluids and pulled the water pump, and one of the bolts holding it on was missing!  Its was the one in the image below with the tap sticking out of it, since the threading all the way back in the front iron was completely stripped!  I'm hoping that I'll just be able to tap into the aluminum front cover with one size bigger to hold the water pump on without causing any other problems - id really prefer not to take the front cover off to re-tap the front iron and deal with possibly dropping the thrust bearing in there etc.  The tap I've got should be long enough to get in to the iron a bit so I can use a larger dia bolt, which is the plan right now.


Also, for the previous month I've been battling with water soaking the carpets whenever it rains - I've replaced the seals along the sides of the targa top, the window bottom seals (to the outside door skins), readjusted the stops for the windows so that they'll meet the top seals in the right spot, messed around with the pockets in the top right behind the doors (they weren't catching all the water running down the back of the windows and top corner of the door, allowing it to run down & pool behind the seats), and sewed up and hopefully re-sealed a couple holes that sprung up at the rear corners of those pockets.  I now know WAY too much about how rainwater is meant to be handled & directed through the car.  Here's one of the holes at the back of the pockets, seen from inside the car under the headliner.

To seal it up, I cut out a patch from some vinyl left over from re-covering the scooter's seat, coated that with E-6000 glue (sticks to vinyl, plastic etc, stays pliable when hard, waterproof etc), stuck it over the hole, and then sewed around the border to help anchor it in place.  I forgot to get a picture of the completed repair, but will try to next time I put the top up.

Offline toplessFC3Sman

  • Sr. Member
  • ****
  • Posts: 405
  • Karma: 8
Re: 1988 Turbo 'Vert Project
« Reply #41 on: May 20, 2013, 07:23:25 PM »
Well, today was definitely one step forward, two steps back...

Got the stripped bolt hole for the water pump tapped, drilled out the hole in the pump slightly to fit the bigger bolt, and got that all installed.  Success!


Then I decided to tackle something different, not wanting to get into all the block cleaning tonight, so I tried to take off that seriously stuck front brake rotor that I encountered when re-packing the wheel bearings.  To make a long story short, no amount of pounding, prying, heating or penetrating oil was getting it to budge, so I decided to try all of the above while applying pressure from the back by tightening the bolts that hold the brake caliper on through their threaded bosses on the spindle and into the backside of the rotor.  It seemed to be going well, so I kept tightening, until I noticed...

I bent the lower ear of the caliper mount out, and it's not moving back in.  Well, crap.  Anyway, time to call it a night, I just ordered a whole new (used - ebay) spindle & hub assembly to replace it, and don't need to worry about removing the brake rotor anymore.  Just need to remove the ball joint, tie rod end & strut from the spindle.  Then maybe take the angle grinder to the old one, just to exact some revenge.

Offline ~Groll69~

  • Administrator
  • Rotary God!!
  • *****
  • Posts: 1235
  • Karma: 1
  • Gender: Male
    • Elegant Lady Bridal and Tuxedo
Re: 1988 Turbo 'Vert Project
« Reply #42 on: May 21, 2013, 07:07:50 AM »
Sounds like some great luck you are having. 
"Long Live Rotary"

An RX-7 is like having a slut as a gf! She will love you, but she will also screw around with the guy at the parts store, most of the local cops, your insurance agent, your apex seals, your bank account and your credit card!!!

Offline ITSWILL

  • Rotary God!!
  • ******
  • Posts: I am a geek!!
  • Karma: 9
  • Gender: Male
Re: 1988 Turbo 'Vert Project
« Reply #43 on: May 23, 2013, 05:30:58 AM »
Let me know if you run into any other issues and need parts, I have a bunch of those spindle assemblies and you are absolutely welcome to whatever you may need for all the help you have given me with my MS.
86 Base LS1 w/100 shot
88 TII 20B T70 turbo

Offline toplessFC3Sman

  • Sr. Member
  • ****
  • Posts: 405
  • Karma: 8
Re: 1988 Turbo 'Vert Project
« Reply #44 on: May 25, 2013, 03:27:45 PM »
Thanks a lot for the offer, I may take you up on it if I manage to break more stuff throughout this tear-down/re-assembly.

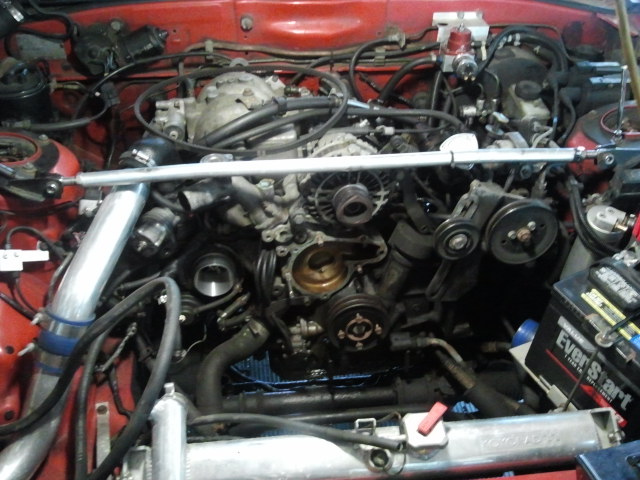
Speaking of which, I'm slowly progressing on the engine peripheral tear-down I started to correct a number of leaks, clean up the whole engine bay, and in general give everything a good once-over.  I had about 4 hours today to pull all the manifolds, turbo etc (and have been taking my time to mark all the vacuum lines, put all the bolts & nuts in baggies & label them etc), and had a few questions.  For reference, as far as I'm aware, all the pieces of the engine are S4 T2, although I pulled it out of a field in Virginia with no history & had it rebuilt, so I don't know too much about it.


First, in the above picture, there are the two bosses from the front iron that are sticking up to match the front cover, but the front cover has studs tightened into it that don't extend back to the front iron for bolting the water pump on (so nothing here attaching the front cover to the front iron).  This definitely seems wrong, but how was it done originally?  Long bolts that went through the waterpump and front cover to thread into the front iron?


Second, and pardon the mess of gasoline & coolant (just removed fuel rails, and leaking o-rings btwn LIM & keg), but the OMP lines are not staying full.  At this point, the car hasn't been run for about 2 weeks.  I made sure they were when first starting the car for the season by holding the lever for the OMP up fully for a while, and a few years ago had checked that the one-way valves in the OMP injectors were working (rebuilt the lines & OMP at the same time).  Is this a symptom of leaky one-way valves, just something that seems to normally happen, or something else?

Thanks a lot!